文章目录
  1. 1. 通用的编辑操作
    1. 1.1. 命令模式
      1. 1.1.1. 命令模式下的常见通用操作
      2. 1.1.2. 命令模式下的光标移动操作
      3. 1.1.3. 命令模式下的编辑操作
    2. 1.2. 可视模式
      1. 1.2.1. 可视模式下的3种选择
      2. 1.2.2. 典型应用
  2. 2. Vim 配置

如果你需要经常在命令行下操作,尤其是需要在服务器上直接进行编辑的环境下,一个趁手的编辑器就是高效开发的关键了。
关于编辑器的争端,在圈内一直都是一个经久不衰的话题,这里我无意去为Vim争辩,只是将平时开发中经常使用到的高效Vim操作做一个总结和记录,下文的内容组织方式会按照典型的开发编辑场景来进行。

通用的编辑操作

命令模式

命令模式下的常见通用操作

  1. 保存退出

    1
    shift + zz
  2. 进入编辑模式

    1
    i
  3. 将光标移至当前行末尾并进入编辑模式

    1
    shift + A
  4. 移到首行/尾行

    首行

    1
    gg

    尾行

    1
    shift + G
  5. 撤销(undo)/重做(redo) 距离上次存盘间的编辑操作

    撤销

    1
    u

    重做

    1
    ctrl + r
  6. 重复上次的操作

    1
    .

命令模式下的光标移动操作

  1. 基本的方向-字符粒度(左下上右)

    1
    hjkl
  2. 按照单词粒度

    向左移动一个单词

    1
    b

    向右移动一个单词至单词首字母

    1
    w

    向右移动一个单词至单词尾字母

    1
    e
  3. 按照行粒度

    行首

    1
    0(数字0不是字母o)

    行首第一个不是空格的字母

    1
    ^

    行尾

    1
    $
  4. 按照页粒度

    下一页

    1
    ctrl + F

    上一页

    1
    ctrl + B
  5. 跳转到第N行

    第一种方式

    1
    :N

    第二种方式

    1
    NG

    以N = 5为例:

    1
    :5
    1
    5G

命令模式下的编辑操作

  1. 拷贝

    1
    y
  2. 粘贴

    1
    p

可视模式

可视模式下的3种选择

命令 按键
基于字符的可视模式 v
基于行的可视模式 V
基于列的可视模式 ctrl + v

典型应用

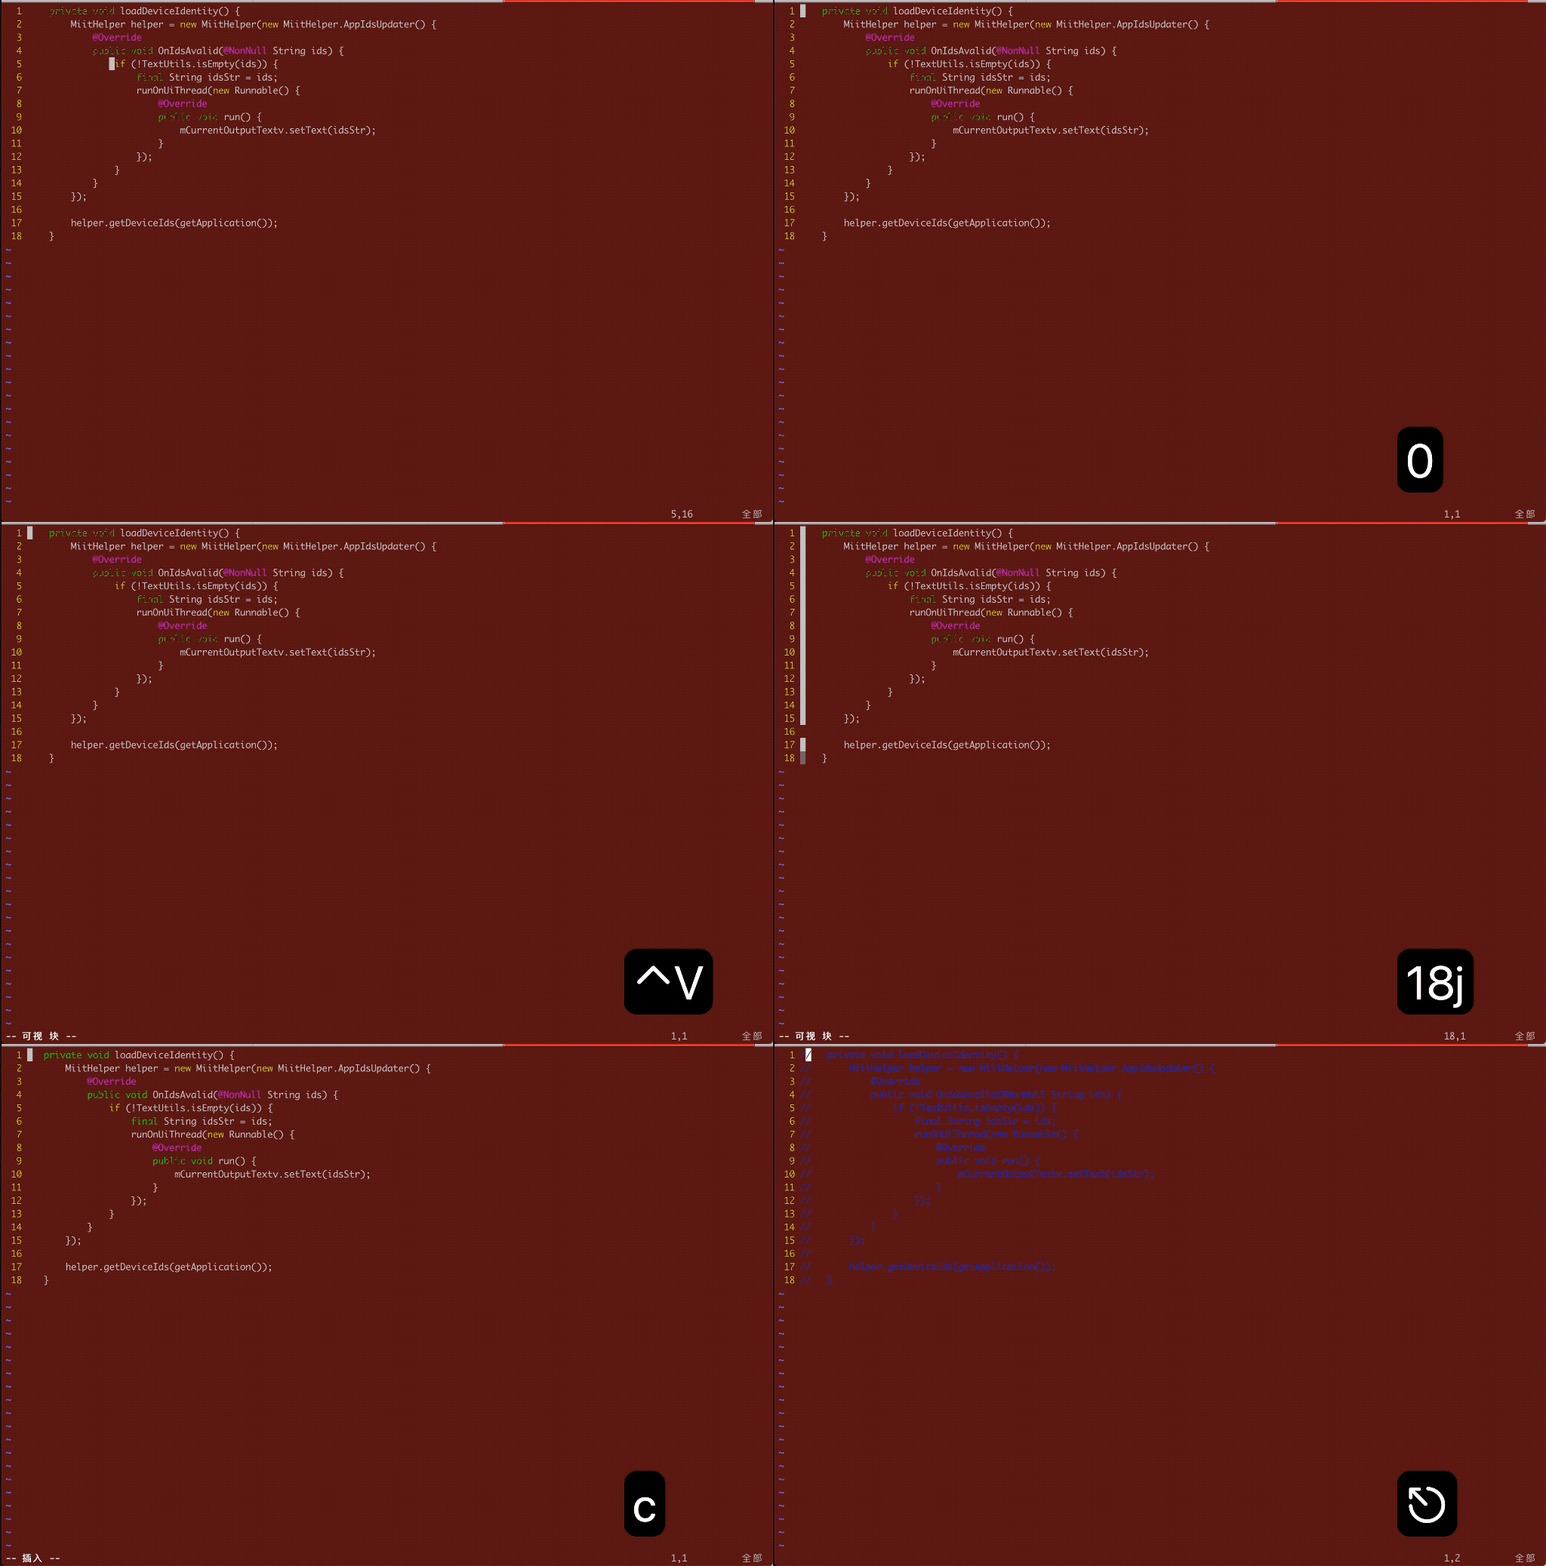
  1. 注释多行(基于列的可视模式)- 多行行首插入注释符

以注释以下这些代码为例子:

1
2
3
4
5
6
7
8
9
10
11
12
13
14
15
16
17
18
private void loadDeviceIdentity() {
MiitHelper helper = new MiitHelper(new MiitHelper.AppIdsUpdater() {
@Override
public void OnIdsAvalid(@NonNull String ids) {
if (!TextUtils.isEmpty(ids)) {
final String idsStr = ids;
runOnUiThread(new Runnable() {
@Override
public void run() {
mCurrentOutputTextv.setText(idsStr);
}
});
}
}
});

helper.getDeviceIds(getApplication());
}

具体操作:

  • 将光标移动到需要编辑的首行的行首(本例子种是“private” 前)

    移动到首行

    1
    gg

    移动到首行行首

    0

  • ctrl + v 进入基于列的可视模式

    ctrl + v

  • 选中多行

    重复向下移动18行

    18j

  • 编辑插入注释字符

    进入编辑插入模式
    c

    输入注释字符
    \\

  • ESC退出

  • 打完收工

以下是操作的录屏
录屏

更新:
还有一种操作选择是:

  • ^ 移动光标到行首
  • ctrl + v 进入基于列的可视模式
  • ctrl + d 移动方向键进行选择
  • I进入编辑模式
  • 输入需要插入的字符
  • ESC退出

更多参考操作:
coolshell - 简明 VIM 练级攻略
10X Efficiency - 命令模式中的基础命令

Vim 配置

~/.vimrc

1
2
3
4
5
6
7
8
9
10
11
12
13
14
15
16
17
18
19
20
21
22
23
24
25
26
27
28
29
30
31
32
33
34
35
36
37
38
39
40
41
42
43
44
set tabstop=4       " number of visual spaces per TAB
set softtabstop=4 " number of spaces in tab when editing
set expandtab " tabs are spaces
syntax on " Turn on syntax highlighting.

" Google code style guide
" =======================
setlocal indentexpr=GetGooglePythonIndent(v:lnum)

let s:maxoff = 50 " maximum number of lines to look backwards.

function GetGooglePythonIndent(lnum)

" Indent inside parens.
" " Align with the open paren unless it is at the end of the line.
" " E.g.
" " open_paren_not_at_EOL(100,
" " (200,
" " 300),
" " 400)
" " open_paren_at_EOL(
" " 100, 200, 300, 400)
call cursor(a:lnum, 1)
let [par_line, par_col] = searchpairpos('(\|{\|\[', '', ')\|}\|\]', 'bW',
\ "line('.') < " . (a:lnum - s:maxoff) . " ? dummy :"
\ . " synIDattr(synID(line('.'), col('.'), 1), 'name')"
\ . " =~ '\\(Comment\\|String\\)$'")
if par_line > 0
call cursor(par_line, 1)
if par_col != col("$") - 1
return par_col
endif
endif

" Delegate the rest to the original function
return GetPythonIndent(a:lnum)

endfunction

let pyindent_nested_paren="&sw*2"
let pyindent_open_paren="&sw*2"
" Google code style guide
" =======================
" End
文章目录
  1. 1. 通用的编辑操作
    1. 1.1. 命令模式
      1. 1.1.1. 命令模式下的常见通用操作
      2. 1.1.2. 命令模式下的光标移动操作
      3. 1.1.3. 命令模式下的编辑操作
    2. 1.2. 可视模式
      1. 1.2.1. 可视模式下的3种选择
      2. 1.2.2. 典型应用
  2. 2. Vim 配置